Theodolite Survey
- A theodolite is an important instrument used for measuring horizontal and vertical angles in surveying.
- The system of surveying in which the angles (both horizontal & vertical) are measured with the help of a theodolite, is called Theodolite surveying.
Applications of Theodolite Survey
- Measuring horizontal and vertical angles.
- Locating points on a line.
- Prolonging survey lines.
- Finding difference of level.
- Setting out grades
- Ranging curves
- Tacheometric Survey
- Measurement of Bearings
Compass Surveying Vs Theodolite Surveying
- Horizontal angles are measured by using a Compass with respect to meridian, which is less accurate and also it is not possible to measure vertical angles with a Compass.
- So when the objects are at a considerable distance or situated at a considerable elevation or depression, it becomes necessary to measure horizontal and vertical angles more precisely. So these measurements are taken by an instrument known as a theodolite.
Classification of Theodolite
Theodolites may be classified as:
- Transit Theodolite.
- Non Transit Theodolite.
Transit Theodolite
A theodolite is called a transit theodolite when its telescope can be rotated through 180° in a vertical plane about its horizontal axis, thus directing the telescope in exactly opposite direction.
Non Transit Theodolite
A theodolite is called a non transit theodolite when its telescope can not be rotated through 180° in a vertical plane about its horizontal axis.
Theodolites can also be classified into two types as follows:
- Vernier Theodolites
- Precise Optical Theodolites (Micrometer Theodolite)
Vernier Theodolites
In a vernier theodolites, verniers are used for taking the readings. These theodolites are most commonly used in general work. The least count of theodolite is 20″.
Precise Optical Theodolites (Micrometer Theodolite)
Precise optical theodolite is fitted with an optical system which is used to read both horizontal and vertical angles precisely. These Theodolites are having a micrometer for taking readings and are also called as Micrometer Theodolite. These theodolites are used for precise work. The least count of theodolite is 1″.
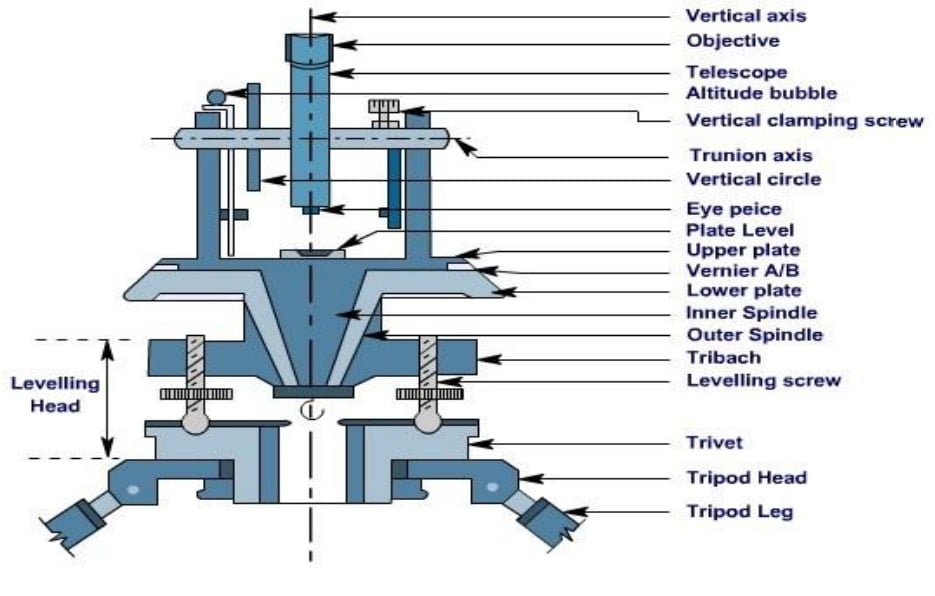
Components of a Vernier Theodolite

Terminologies in Theodolite Surveying
Centering
Process of setting up instrument exactly over station. (Plumb Bob)
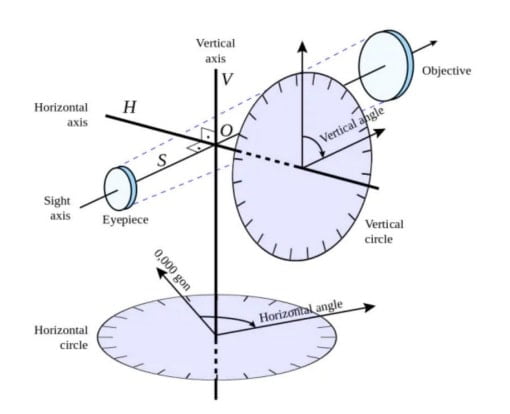
Vertical Axis or Azimuth Axis
Axis about which the instrument rotates in the horizontal plane.
Horizontal Axis or Trunnion Axis
Axis about which the telescope and vertical circle rotates in vertical plane.
Axis of the telescope
It is also known an imaginary line joining the optical centre of the object- glass to the centre of eye piece.
LOS/LOC
Line passing through intersection of cross hair and optical Centre of objective lens.
Transiting /Plunging /Reversing
Process of turning telescope in vertical plane through 180 degree.
Axis of level tube Bubble line
A straight line tangent to the longitudinal curve of the level tube at it Centre. It is horizontal when bubble is at Centre.
Swinging
Process of turning the telescope in horizontal plane.
Face left observation
The observation of an angle(H/V) when vertical circle is left of observer.
Face Right Observation
The observation of an angle(H/V) when vertical circle is Right of observer.
Telescope normal
When the face of the vertical circle is to the left of the “bubble up”.
Telescope Inverted
When the face of the vertical circle is to the right of the “bubble up”.
Double Sighting
Measurement of horizontal and vertical angle twice, first in normal and then in inverted condition.
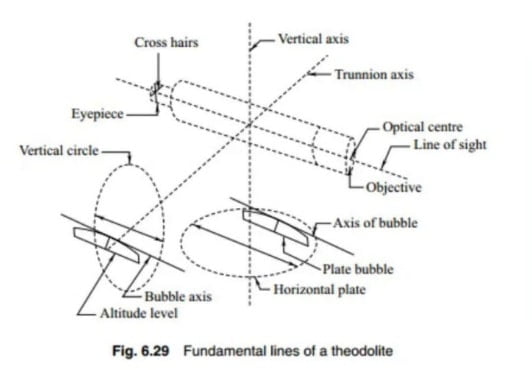
Fundamental Lines

1. The axis of Plate level is perpendicular to the vertical axis.
2. The horizontal axis is perpendicular to the vertical axis.
3. The line of collimation axis is at right angle to the horizontal axis.
4. The axis of altitude level is parallel to the line of collimation when it is horizontal, and vertical circle reads zero.
Temporary Adjustments of Theodolite
It consists of following operations:
- Setting
- Centring
- Leveling
- Focussing.
Setting
The setting operation consists of fixing the theodolite with the tripod stand along with approximate leveling and centring over the station. For setting up the instrument, the tripod is placed over the station with its legs widely spread so that the centre of the tripod head lies above the station point and its head approximately level (by eye estimation). The instrument is then fixed with the tripod by screwing through trivet. The height of the instrument should be such that observer can see through telescope conveniently. After this, a plumb bob is suspended from the bottom of the instrument and it should be such that plumb bob should point near to the station mark.
Centring
The operation involved in placing the vertical axis of the instrument exactly over the station mark is known as centring.
First, the approximate centring of the instrument is done by moving the tripod legs radially or circumferentially as per need of the circumstances.
Finally, exact centring is done by using the shifting head of the instrument. During this, first the screw-clamping ring of the shifting head is loosened and the upper plate of the shifting head is slid over the lower one until the plumb bob is exactly over the station mark. After the exact centring, the screw clamping ring gets tightened.
Leveling
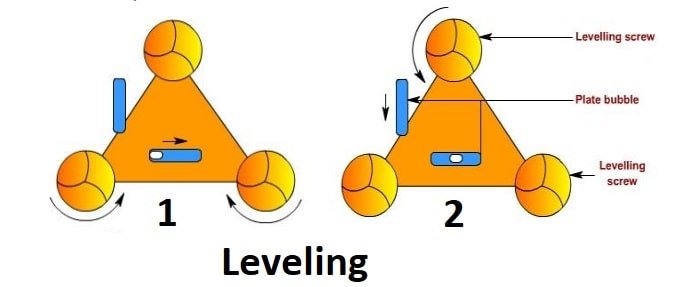
Leveling of an instrument is done to make the vertical axis of the instrument truly vertical. Generally, there are three leveling screws and two plate levels are present in a theodolite instrument. Thus, leveling is being achieved by carrying out the following steps

Step 1: Bring one of the level tube parallel to any two of the foot screws, by rotating the upper part of the instrument.
Step 2: The bubble is brought to the centre of the level tube by rotating both the foot screws either inward or outward. The bubble moves in the same direction as the left thumb
Step 3: The bubble of the other level tube is then brought to the centre of the level tube by rotating the third foot screw either inward or outward
Step 4: Repeat Step 2 and step 3 in the same quadrant till both the bubble remain central.
Step 5: By rotating the upper part of the instrument through 180°, the level tube is brought parallel to first two foot screws in reverse order.
Note: The bubble will remain in the centre if the instrument is in permanent adjustment. Otherwise, repeat the whole process starting from step1 to step5.
Focusing
To obtain the clear reading, the image formed by the objective lens should fall in the plane of diaphragm and the focus of eye-piece should also be at the plane of diaphragm. This is being carried out by removing parallax by proper focusing of objective and eye-piece. Thus, focusing operation involves two steps.
1.Focusing of Eye-piece
The eye-piece is focused to make the appearence of cross hairs distinct and clear. This is being carried out in steps: First, point the telescope towards the sky or hold a sheet of white paper in front of the objective; Next, move the eye-piece in or out by rotating it gradually until the cross hairs appear quite sharp and clear. Focusing of eye-piece depends on the eye-sight of observer and so for each observer it needs to adjusted accordingly.
2.Focusing of Objective
It is done for each independent observation to bring the image of the object in the plane of cross hairs. It includes following steps of operation: First, direct the telescope towards the object for observation. Next, turn the focusing screw until the image of the object appears clear and sharp as the observer looks through properly focused eye-piece. If focusing has been done properly, there will be no parallax.
Permanent Adjustment of Theodolite
An instrument is said to in permanent adjustment if it satisfies all the relations among its fundamental lines. The permanent adjustments are made to establish the relationship between the fundamental lines of the theodolite.
The permanent adjustment of an instrument usually gets disturbed after long or prolonged use. So, the state of relationship among different fundamental lines should be checked occasionally and corrections are required to be done, if necessary.
 The operations are based on the geometry of the fundamental line and thus, may get upset one relation while rectifying other. In order to avoid such possibility, the permanent adjustment should be made in the order.
1. Adjustment of Vertical cross hair;
2. Adjustment of plate level axes;
3. Adjustment of line of sight;
4. Adjustment of horizontal axis;
5. Adjustment of the axis of the telescope;
6. Adjustment of vertical circle index.
Method to Measure Angles
There are two methods of measuring angles:-
i) Method of Repetition
ii) Method of Reiteration/ Direction/ Series